You can watch a video of me making my "Un-Smashed Smash Book" here.
And, below you will find tons of pictures of my finished book. I'm really, really happy with it and started adding goodies to it as soon as I finished it! I think I'm addicted. lol
The cover was embossed with flowers, so I used my Inktense Pencils and
Neo Color II's to color in the image. I added the white dots to help things
pop. And some odd's and ends in the bottom corner.
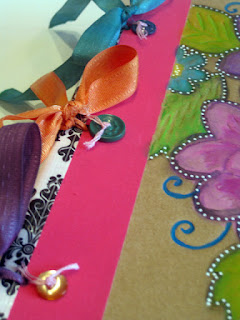
I bound my book with satin seam binding that I had colored last year
with some color washes. Be sure to put Fray-Check on ends so your
ribbon doesn't unravel!
I had originally punched holes in the front cover much farther in that I had wanted and
ended up punching new holes closer to the edge. That left me with three holes on the front, so
I decided to sew buttons there to cover the holes. In another photo of the inside cover, you can
see the bottons that are sewn to the other side of the ones pictured above.
Here are the buttons that are sewn to the buttons on the front cover.
I really liked this vellum page that came with the book, so I decided to
color it in wish Sharpies to highlight the words and pictures better.
I drew this girl a couple of weeks ago and decided to add her as my first page.
Alien cut from a box of Puffs tissues....my 5 year old will be very angry when
she sees this because she was saving the box to make something out of it. I
do have another one of these upstairs, so she will still get one for herself. lol
I just thought he was too cute to not use! And, exactly the thing to put in your
Smash Book, right? ;-)
Adding things here and there and will be adding more to these pages
as I go along.....
Here are some photos of the type of extra pages that I added to my
Un-Smashed Smash Book. I pretty much went through my stash of
papers and pulled out whatever caught my eye.....
book pages......
pieces of music paper and papers with doodles on them....
ancient index pages for Club Scrap kits and scrap paper
with excess color sprays from stencils on them....
scrap paper that I've created other art journal pages on and
one with a doodle made by one of my children....
I even added some envelopes....
I hope that you enjoyed seeing how I turned my Smash Book into something that's truly ME and now something that I will be using for sure! I'd love to see how you're using your Smash Books, so please leave a link in the comments if you would like to share! And, be sure to visit often, because I plan on sharing pages from my book as I complete them.
Thanks so much for visiting and I hope you have a wonderful day!
di


Di this is awesome! And yay for odd-hour inspirations! xo
ReplyDeleteLove your beautiful smash book, Di! The cover is gorgeous, and love all your pages so far!.. I've been smashing, junk/art journaling for well over a year, at LEAST, AND I LOVE IT! Almost every single night, I turn to mine to jot down my day; then I scrap it, collage it, paint it, or whatever, right along with it. And from cover to cover, like you say, it's all ME! My heart, my art, and all my memories. Hope you'll share more of your pages soon, and have a great week! ~tina
ReplyDelete♥ what you did with your Smash book. You are supposed to make it your own right? And that's exactly what you did!!! Love the cover and dotting it up was just the perfect touch.
ReplyDelete